| Creating Objects | ||
|
||
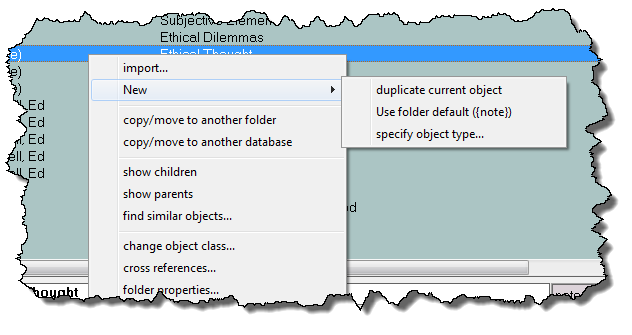
| Figure 1: Folder Popup With Options for Creating Objects | ||
New objects are created within folders. When they are created, they will be added to the end of the folder. The options for creating new object are:
|
||
| Selecting An Object's Class | ||
|
||
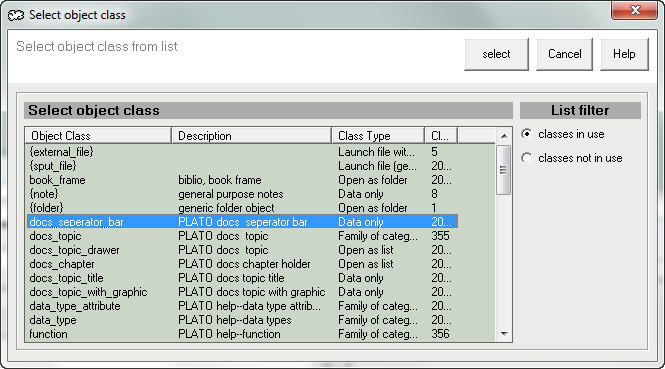
| Figure 2: Dialog for Selecting a New Object's Class | ||
| If you choose to specify an object class manually, the above dialog will appear. From this dialog you may select the object class you want to create. Note that there are two ways to filter the list: 'objects in use' and 'unused objects.' The first gives a list of the object classes currently in use in the database. The second give a list of all the object clases in the current class library that are not in use by the current database. |
||
| Importing Objects | ||
|
||
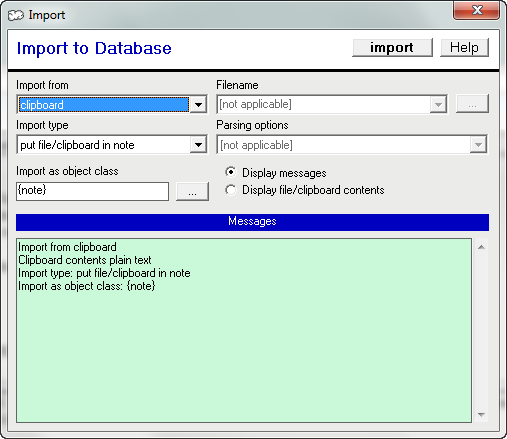
| Figure 3: Object Import Dialog | ||
| Data can be imported into Plato from the clipboard or from files. To import, right-click in the folder pane and select 'import...' Or from the main menu, select "import new object..." from the object menu. This will invoke the import pane. The import pane allows you to import the current contents of the clipboard or a selected file. The default is the clipboard. You may import text or RTF from the clipboard--image information cannot be imported using the import pane, however you can drag and drop images into existing notes. The import pane has the following settings:
|
||
| Editing Objects | ||
| For imformation on selecting objects see \ref{DataEntry:select}. Objects can be changed and edited by selecting them from a folder and opening the object properties pane. Open the object properties pane by right clicking in the folder list and bringing up the folder pop-up menu. From the menu, uncheck 'hide data pane.' The data pane will appear beneath the folder pane. Note the drop down list at the top right-hand corner of the pane. This allows you to select the data view--notes, properties, or notes and properties in a split pane. When you change the note text or properies of an object, the object title bar will turn yellow to indicate that you've changed it. Clicking on another object in the folder or starting some other action will automatically save the changes. Until then, clicking the 'undo' button on the object title bar will undo the changes you've made. |
||
| Editing Notes | ||

|
||
| Figure 4: Note Editing Pane | ||
| The note field is a rich-text window allowing any amount of text to be placed into it. Notes can be entered in plain text and enhanced using rich text attributes. Text and graphics may be dragged and dropped into the note field from other Windows applications as well. Formatting operations such as word wrap and text clean-ups may be applied selectively or to the entire note. The note field is not a full featured text editor or word processor but it does allow basic control over fonts, text enhancements, and lookups. |
||
| Editing Note Fields | ||
|
||
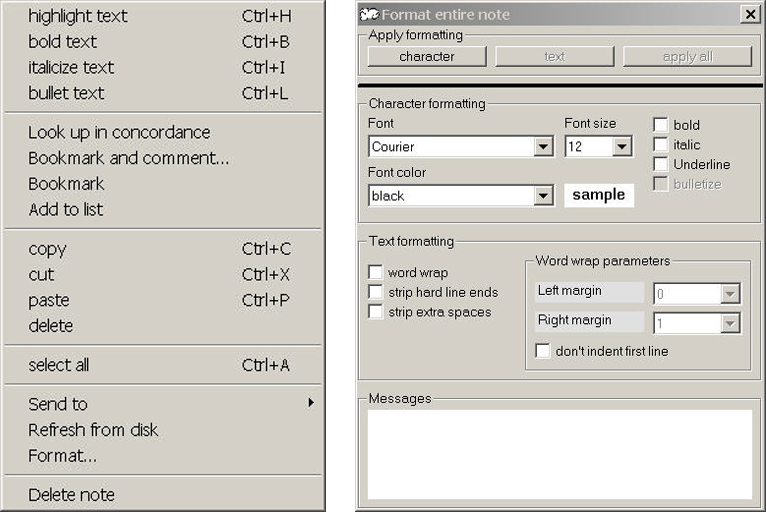
| Figure 5: Note Format Popup and Dialog | ||
Here is the note popup menu with a list of note functions:
|
||
| Editing Properties | ||
|
||
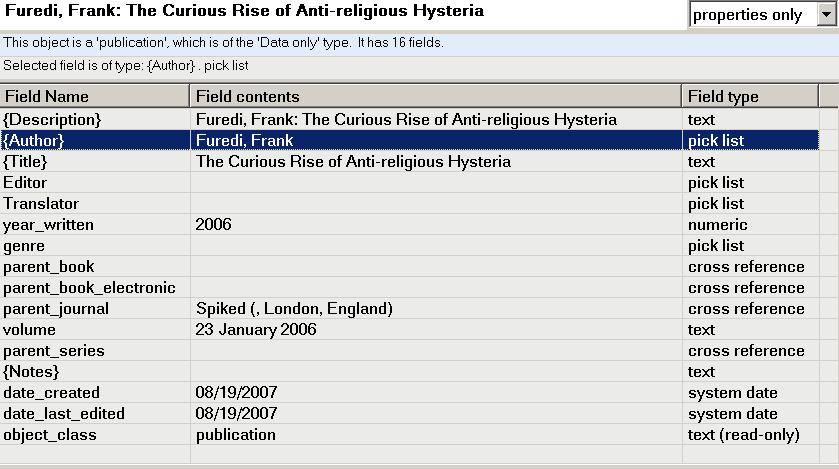
| Figure 6: Properties Editing Pane | ||
| The property pane displays the various properties (metadata) of an object. The left column displays the property name; the center column the data; and the right column the data type. The three lines above the property fields display the description of the object, brief information about the object, and information about the selected field. |
||
| Property Edit Fields | ||
|
||
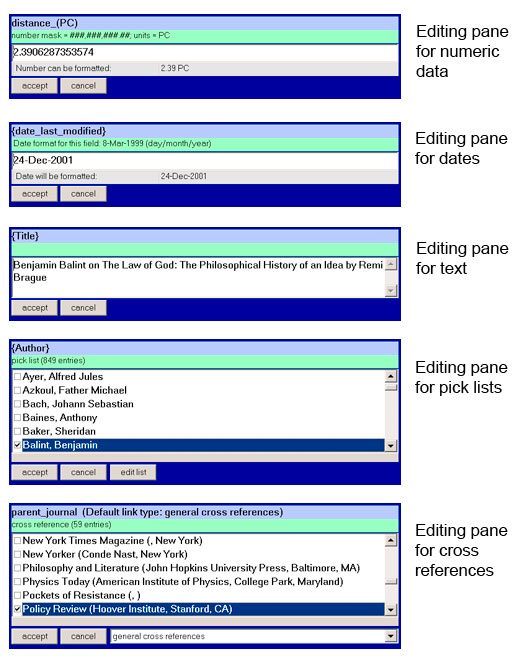
| Figure 7: Property Fields for Editing and Validation | ||
| Properties may be edited by selecting the property from the property pane and double-clicking or pressing 'enter.' This will open editing panes tailored for various field types. The behavior of editing panes depends on the way the field is configured in the class library. Each field pane has an 'accept' button and a 'cancel' button with which to save your field changes or abandon them. Shortcut: You may also press ENTER to accept changes of ESC to cancel. Some fields have additional buttons that allow you to configure the field. All fields are fully validated according to the rules set up for them in the class library. For numeric fields, this can mean Text Panes The captions on top give the name of the field and its formatting: upper case, lower case, title case, name case, or literal case. Beneath these is the text field. It's designed to accomodate small amounts of text, but any amount of text up to 30 kb can be placed there. Number panes The top captions give the name of the field and its formatting: number mask, units (if any), and range. Below this is the number field. What you may enter in the number field is restricted by the number mask and range. Date panes The top captions give the name of the field and its formatting; for dates this will the predefined display format selected in the class library. Dates can be typed in any format and they will automatically be correctly formatted (or the dialog warn you when there's something wrong with the date you've typed). You may also type "now" or "today" and today's date will be used. >?Note: the date pane may become confused if the date is supplied in "year-day-month" order. Pick Lists Displays the items in the pick list. When multiple items are displayed, multiple selections can be made. If the "Edit list" button is displayed, the entire list may be edited from the edit pane. Cross References Displays a list of objects to be cross referenced. As with the pick lists, when multiple items are displayed multiple selections can be made. Selections made here will automatically be cross referenced with the object you're editing. |
||
| Copying, Moving, Deleting Objects | ||

|
||
| Figure 8: Dialog for Copying/moving Folders | ||
| Using the Cross Reference Window The cross reference window is a multi purpose window; from it you copy or move objects, as well as change object classes and cross references. For each of the actions below you will access the cross reference window to carry things out. Copy/Moving Objects between Folders Objects can be copied or moved between folders using the cross reference pane. Select the objects you want to move or copy in the folder pane and right click the mouse, and select "copy/move to another folder" from the pop up menu. The cross reference window will appear with a list of the objects you selected in the top list. The bottom list contains a list of the folders you may move them to. Note the option buttons to the right of the "copy/move" button. Select either "copy" or "move" (the default is "copy"). Then select a folder and click the "copy/move" button to copy or move the objects. Note that moving objects means that they will be first copied to the new folder then deleted from the current folder. (Note: you are only copying or moving >!pointers to objects in this operation; the object itself will never be deleted from the database). Copy/Moving Objects between Databases Follow the procedure for copy/moving between folders, except select "copy/move between databases" from the folder pop up menu. The bottom list in the cross reference window will now contain a list of databases instead of folders; otherwise the procedure is the same. You should select a database that uses the same class library as the current database, otherwise the target database may not recognize the objects you've sent to it. Plato will warn you if you are about to copy or move objects to a database that uses a different class library. Warning: When you move objects between databases, the objects you're moving will really be deleted from the current database, unlike when moving between folders. Deleting Objects from Folders To delete objects from folders, select the objects you want to delete in the folder pane and right click the mouse, and select "delete from view" from the pop up menu. The objects will be deleted from the folder (but not the database). Deleting Objects from the Database To delete objects from the database, select the objects you want to delete in the folder pane and right click the mouse, and select "delete from database" from the pop up menu. Plato will warn you, then delete the objects from the database. The objects will also be deleted from every folder that contained it. If you decide you've made a mistake you can always undo the command. |
||